
# 2022년 9월
# 9월 1일 - nomad 서비스 스케쥴러
# 서비스 스케줄러
서비스 스케줄러는 클러스터 내의 컴퓨팅 리소스를 관리하고 사용자 애플리케이션을 어느 호스트에서 서비스할지 결정하는 시스템 소프트웨어
# nomad와 쿠버네티스의 차이점
쿠버네티스는 기반 인프라가 갖춰져야 사용 가능하다.반면 노마드는 컨테이너화를 하지 않고도 오케스트레이션을 할 수 있다는 장점이 있다.
# 노마드 설치
$ curl -fsSL https://apt.releases.hashicorp.com/gpg | sudo apt-key add -
$ sudo apt-add-repository "deb [arch=amd64] https://apt.releases.hashicorp.com $(lsb_release -cs) main"
$ sudo apt-get update && sudo apt-get install nomad
$ sudo nomad agent -dev -bind=0.0.0.0 > /dev/null 2>&1 &
# Job Spec
- nomad의 Java Driver는 주어진 Job Spec에 따라 JAVA_HOME을 선택하고 cgroups, namespaces, chroot 등으로 job을 isolation시켜서 구동한다.
- nomad의 Java Driver 스펙에는 jar_path, args, jvm_options등을 지정하며, 부가적으로 구동될 JVM의 버전을 선택할 수 있다.
##example.nomad
job "hello" {
  datacenters = ["dc1"]
  type = "service"

  group "helloGroup" {
    count = 1

    task "helloTask" {
      driver = "java"

      config {
        jar_path = "local/java-sample-all.jar"
        jvm_options = ["-Xmx2048m","-Xms256m"]
      }
      resources {
        network {
          mbits = 10
          port "http" {}
        }
      }
      service {
        name = "hello"
        tags = ["hello"]
        port = "http"
        check {
          name     = "alive"
          type     = "tcp"
          interval = "10s"
          timeout  = "2s"
        }
      }
      artifact {
        source = "https://internal.file.server/hello.jar"

        options {
        checksum = "md5:123445555555555"
        }
      }
    }
  }
}
# Service
- nomad는 서비스 실행 시 호스트에서 사용되지 않는 임의의 포트번호를 서비스에 할당한 후 런타임에 환경변수로 NOMAD_PORT_[포트이름]를 전달한다.
- 각 서비스는 실행 시 전달받은 포트를 사용하여 구동된다.
# Running a Job
$ nomad run example.nomad
# 9월 2일 - WebClient와 WebTestClient
# HTTP 통신 템플릿
스프링에서 가장 대중적인 HTTP 통신 템플릿을 꼽아보자면 RestTemplate과 WebClient가 있다. WebClient는 스프링 5.0부터 등장했고, 비동기화와 Non-Blocking이 가능하다는 장점이 있다.
# WebClient 생성
- Static Factory methods
- WebClient.builder() Builder 사용
- uriBuilderFactory : base URL을 사용하기 위한 Customized UriBuilderFactory
- defaultUriVariables : URI 템플릿을 확장할 때, 사용하는 기본 값
- defaultHeader : 모든 요청에 대한 기본 헤더
- defaultCookie : 모든 요청에 대한 쿠키 설정
- defaultRequest : 모든 요청을 customize하기 위한 Consumer
- filter : 모든 요청에 대한 Client filter
- exchangeStrategies: HTTP message reader/writer customization
- clientConnector : HTTP client library settings
# Reactor Netty
- WebClient에서 Reactor Netty를 사용함에 있어, 만약 Reactor Netty의 세부 설정들을 변경하고 싶다면 clientConnector 옵션에 customize한 HttpClient를 제공하면 된다.
HttpClient httpclient = HttpClient.create().secure(sslSpec -> ...);

WebClient webClient = webClient.builder()
        .clientConnector(new ReactorClientHttpConnector(httpClient))
        .build();
# retrieve()
- retrieve() 메서드는 결과를 어떻게 추출할 것인지 명시하는데 사용한다.
WebClient client = WebClient.create("https://example.org");

Mono<ResponseEntity<Person>> result = client.get()
        .uri("/persons/{id}",id)
        .accept(MediaType.APPLICATION_JSON)
        .retrieve()
        .toEntity(Person.class);
- 또는, body만 받아올 수도 있다.
WebClient client = WebClient.create("https://example.org");

Mono<ResponseEntity<Person>> result = client.get()
        .uri("/persons/{id}",id)
        .accept(MediaType.APPLICATION_JSON)
        .retrieve()
        .bodyToMono(Person.class);
# Exchange
- exchangeToMono(), exchangeToFlux() 메서드들은 response status에 따라 결과를 다르게 디코딩하는 것 처럼 좀 더 advance하게 사용할 때 유용하다.
### OK(200)이 왔을 때는 Person 클래스로 디코딩하고, 4xx이 왔을 때는 ErrorContainer 클래스로 디코딩하고,
        나머지로 온 경우엔 error를 발생시키고 싶다면.

Mono<Object> entityMono = client.get()
        .uri("/persons/1")
        .accept(MediaType.APPLICATION_JSON)
        .exchangeToMono(response ->{
			if(response.statusCode().equals(HttpStatus.OK)){
				return response.bodyToMone(Person.class);
        }
			else if(response.statusCode().is4xxClientError()){
				return response.bodyToMono(ErrorContainer.class);
        }
			else{
				return response.createException().flatMap(Mono::error);
        }
        });
# Request Body
- Request body는 Mono 같은 ReactiveAdapterRegistry 에 의해 핸들링되는 비동기 타입으로도 사용할 수 있다. 즉, Reactor 기반의 Mono , Flux 클래스 타입을 사용할 수 있다.
Mono<Person> personMono = ...;

Mono<Void> result = client.post()
        .uri("/persons/{id}",id)
        .contentType(MediaType.APPLICATION_JSON)
        .body(personMono, Person.class)
        .retrieve()
        .bodyToMono(Void.class);
- 만약 실제 값을 활용하고 싶다면 또는 사용하고 있다면, bodyValue 를 통해 body를 구성할 수 있다.
Person person = ...;

Mono<Void> result = client.post()
        .uri("/persons/{id}", id)
        .contentType(MediaType.APPLICATION_JSON)
        .bodyValue(person)
        .retrieve()
        .bodyToMono(Void.class);
# Form Data
- Form data를 전송할 때는 body에 MultiValueMap<String,String>을 사용해야만 한다.
MultiValueMap<String,String> formData = ...;

Mono<Void> result = client.post()
        .uri("/path",id)
        .bodyValue(formData)
        .retrieve()
        .bodyToMono(Void.class);
# Multipart Data
- multipart data를 보내기 위해선 body에 MultiValueMap<String, ?> 을 사용해야 한다. 여기서 Value에는 part content를 나타내는 Object instance 또는 part의 컨텐츠, 헤더를 나타내는 HttpEntity 인스턴스가 들어가야 한다.
- multipart data를 편하게 사용하기 위해서 MultipartBodyBuilder API가 존재한다.
MultipartBodyBuilder builder = new MultipartBodyBuilder();
builder.part("fieldPart","fieldValue");
builder.part("filePart1",new FileSystemResource("...logo.png"));
builder.part("jsonPart",new Person("Jason"));
builder.part("myPart",part);

MultiValueMap<String, HttpEntity<?>> parts = builder.build();

Mono<Void> result = client.post()
        .uri("/path",id)
        .body(builder.build())
        .retrieve()
        .bodyToMono(Void.class);
# Filters
- 요청 처리 전 Request들을 변경하거나, 인터셉트하고 싶은 경우, WebClient.Builder 에서 client filter(ExchangeFilterFunction)를 사용하면 된다.
WebCient = client = WebClient.builder()
        .filter(basicAuthentication("user","password"))
        .build();
# Attributes
- WebClient 사용 시, Request에 attributes를 추가할 수도 있다.
- Attribute는 filter와 함께 사용할 때 유용하면서 편리하게 사용될 수 있다. 주어진 요청에 특정 attribute 값이 있을 때, 특정 행동을 하게 한다거나 하는 등 기능을 추가할 수 있다.
WebClient client = WebClient.builder()
        .filter((request.next)->{
			Optional<Object> usr = request.attribute("myAttribute");
        })
        .build();

client.get().uri("https://example.org/")
        .attribute("myAttribute","...")
        .retrieve()
        .bodyToMono(Void.class);
# Context
- Attributes는 필터에 정보를 전달하는 쉬운 방법이지만, 현재 실행되는 요청에만 영향을 줄 수 있다.
- 만약 flatMap을 통해 중첩되거나, concatMap을 통해 실행되는 추가 요청으로 정보를 전파하고 싶은 경우엔, Reactor Context를 사용해야 한다.
WebClient client = WebClient.builder()
        .filter((request, next)->
           Mono.deferContextual(contextView ->{
               String value  = contextView.get("foo")
           }))
        .build();
client.get().uri("https://example.org/")
        .retrieve()
        .bodyToMono(Sting.class)
        .flatMap(body ->{

        })
        .contextWrite(context -> context.put("foo",...));
# Synchronous Use
- WebClient는 기본적으로 비동기로 작동한다. 하지만, 만약 동기로 작동하게 싶다면 block()을 사용하면 된다.
- 하지만, Spring MVC/Webflux - Flux, Mono 를 사용하는 환경에서는 절대(Never) block을 사용해서는 안된다. 그냥 단순히 controller 메서드에서 reactive type을 넘기는 식으로 진행해야 한다.
# 9월 15일 - Reverse Proxy
# Reverse Proxy 란?
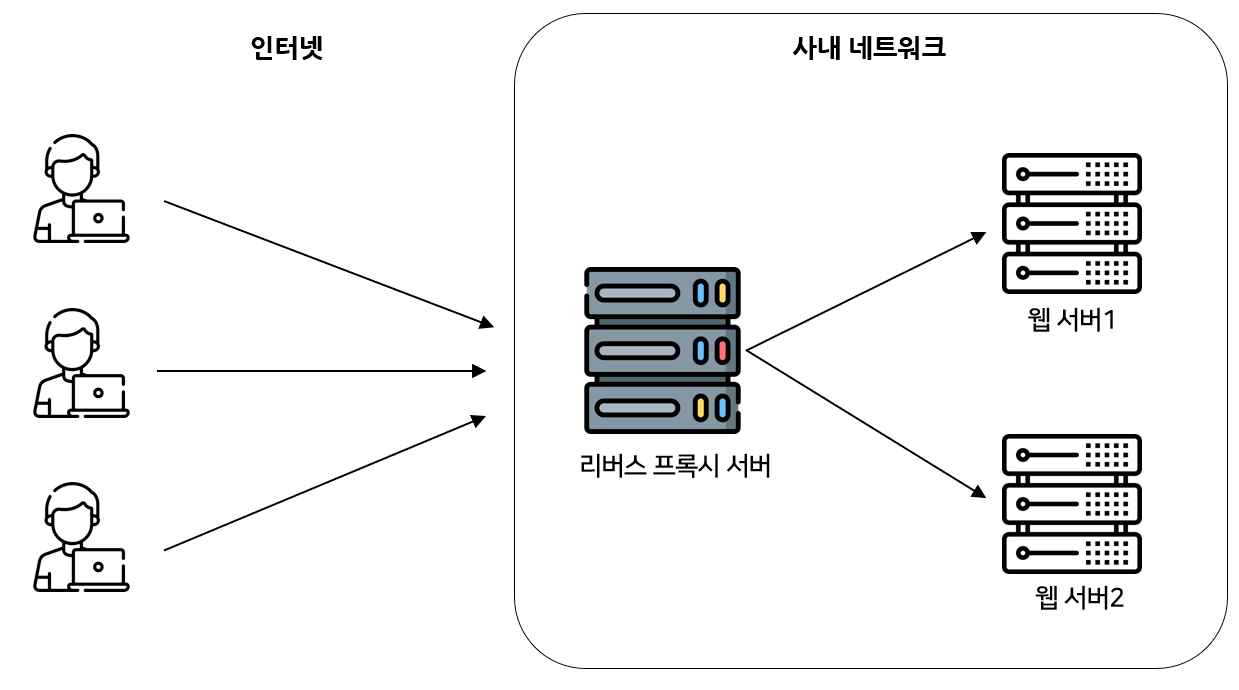 클라이언트 앞에 프록시 서버를 놓는 포워드 프록시와 다르게 리버스 프록시는 프록시 서버를 웹서버 앞에다 놓는다.
웹서버 앞에 놓음으로 써 클라이언트는 웹서버에 직접 접근이 어렵고 그에 따라 보안이 강화된다.
클라이언트 앞에 프록시 서버를 놓는 포워드 프록시와 다르게 리버스 프록시는 프록시 서버를 웹서버 앞에다 놓는다.
웹서버 앞에 놓음으로 써 클라이언트는 웹서버에 직접 접근이 어렵고 그에 따라 보안이 강화된다.
# Reverse Proxy의 장점
웹 서버와 프록시서버가 붙어있기 때문에 다양한 전후처리를 시행할 수 있다.
- HTTP 요청 내용에 따른 시스템의 동작 제어
- 클라이언트의 IP 주소를 보고 특정 IP 주소만 서버로의 접속을 허가
- 클라이언트의 User-Agent를 보고 특별한 웹서버로 접속되도록 유도
- 시스템 전체의 메모리 사용효율 향상
- 정적 리소스 처리를 위해 캐시 서버를 둘 수 있다.
- 웹 서버가 응답하는 데이터의 버퍼링의 역할
- 클라이언트와 Reverse Proxy 사이에만 Keep-Alive on, Reverse Proxy와 백엔드 사이에는 Keep-Alive OFF로 설정하여 메모리 소비량을 줄인다.
# 9월 26일 - mockMVC
# mockMVC란?
- 스프링 MVC의 설정을 적용한 DI 컨테이너를 만들어 이 DI 컨테이너를 사용해 스프링 MVC 동작 재현애플리케이션 서버에 배포한 것과 같은 것 처럼 테스트 가능
@AutoConfigureMockMvc
@SpringBootTest
@ActiveProfiles("prod")
class LogControllerTest {

   @Autowired
   private MockMvc mockMvc;

   @Test
   @DisplayName("click 로그 생성 테스트")
   @Transactional
   void createLogclick() throws Exception {

      String content = "{\"userToken\": \"test\"" +
              ", \"contentId\": \"12\"" +
              ", \"type\": \"I\"}";

      ResultActions perform = mockMvc.perform(post("/logclick/create")
              .contentType(MediaType.APPLICATION_JSON)
              .content(content));

      perform.andExpect(status().isOk());
   }

}
- AutoConfigureMockMvc : @WebMvcTest와 동일하게 bean파일을 메모리에 올려서 사용하는데 가장 큰 차이점은 컨트롤러 뿐만 아니라 테스트 대상이 아닌 @Service나 @Repository에 붙은 객체들도 모두 메모리에 올린다는 점이다.
- SpringBootTest : AutoConfigureMockMvc 사용시에 SpringBootTest 어노테이션을 같이 사용한다.
- ActiveProfiles : 테스트시 사용할 profile을 선택한다.
- Transactional : Transactional 어노테이션을 사용할시에 트랜잭션 후에 롤백을 한다.
- ResultActions : ResultActions 인터페이스에서 제공하는 andExpect, andDo, andReturn 메소드를 통해 mock객체를 통신하도록 한다.